Pages

Showing posts with label recipe. Show all posts

Friday, 5 June 2015

Penang soup

I have a cold, but just a little cold. Not enough to knock me right out, but enough to be really annoying. I can't cough with much vigour because my abdominal muscles (who knew I even had any?) still hurt from my Wednesday workout. I'm doing tiny little lady coughs that aren't actually accomplishing anything, and I sound like an idiot. It's a good thing that I'm working from home today.

My lovely friend Georgia posted a recipe yesterday for a Thai-inspired soup, and it sounded like the perfect remedy for a cold. One of the benefits of having a terrible short term memory is being pleasantly surprised by things I find in my cupboard that I forgot I bought - like a tub of Penang curry paste. I'd just made some chicken stock to help knock out Jack's cold, the weather turned cold and rainy today, so soup was the sensible lunchtime conclusion. I made this recipe up based on what I'd usually add to my standard Thai curry, with a little nod to laksa.

I only needed to feed me today, so I made the full batch of soup but didn't add the noodles, prawns, or lime juice to the pot. I added these to my bowl and ladled the hot stock on top, and put the rest of the soup in the fridge for another day. The paste I used was pretty hot, so not only are my sinuses clearer, I can see through time. (Thank you for that reference, Lisa Simpson.) If you've got leftover chicken or some other form of animal protein, by all means use that instead of prawns.

This isn't even remotely authentic. It's like a thinned out Thai curry on rice noodles instead of rice. I'm not really selling this, am I? It's good. Trust me.

Where are the prawns?

Oh look, there they are.


Thai Penang Curry Soup
(Serves 4)
50g/3 heaped tablespoons Penang curry paste
1 tbsp oil
400 ml/1 tin coconut milk
1 litre/4 cups of chicken or fish stock (unsalted, because you're adding fish sauce for seasoning)
4 "nests" of rice vermicelli (I used the Mama Noodles brand at 45g for each portion)
2 tbsp fish sauce
2 tbsp palm sugar (You can also use dark brown sugar or raw cane sugar)
200g/about 20 king prawns
Juice of 1 lime, or more to taste
Garnishes: bean sprouts, coriander/cilantro, spring onions/green onions, or whatever else strikes your fancy.

Fry the curry paste in the oil over medium heat for about 2-3 minutes. Add the coconut milk and stock, and bring to a boil. Turn the heat down and simmer for 15 minutes or so. 

While the soup is simmering, add boiling water to the vermicelli and let stand according to package instructions. Mine only took three minutes, so you can do this near the end. Drain and set aside.

Add the fish sauce and palm sugar to the soup and stir until the sugar dissolves. Add the prawns* and noodles, stir and heat the soup through for a minute or two. Squeeze the lime juice on top.

Ladle/pour/slop the soup into bowls and top with your garnishes. Say goodbye to your cold.

*If you're using raw prawns, throw them in at the end for about two minutes, and cook until they're thoroughly pink.

Per serving: 499 calories, 23g fat, 24g protein, 48g carbs.

Tuesday, 19 May 2015

banana muffins

I wish I had an interesting story about this recipe, but I don't. Sorry about that. 

I had some very ripe bananas and Jack asked me to make him some muffins to take in his lunchbox. He's not allowed to bring in anything with nuts and I wanted to have some as well, so I went with this nut-free and wheat-free recipe: http://wellnessmama.com/2637/grain-free-banana-bread-muffins/


I didn't add any milk as the batter was runny enough and I used butter instead of coconut oil. And they were really good. The end.
Per muffin: 153 calories, 9g fat, 12g carbs, 6g protein.

Friday, 1 May 2015

frittata 4 dayz

Paul and I can't say the word "fritatta" without sounding like the angry Scottish bloke in this advert:


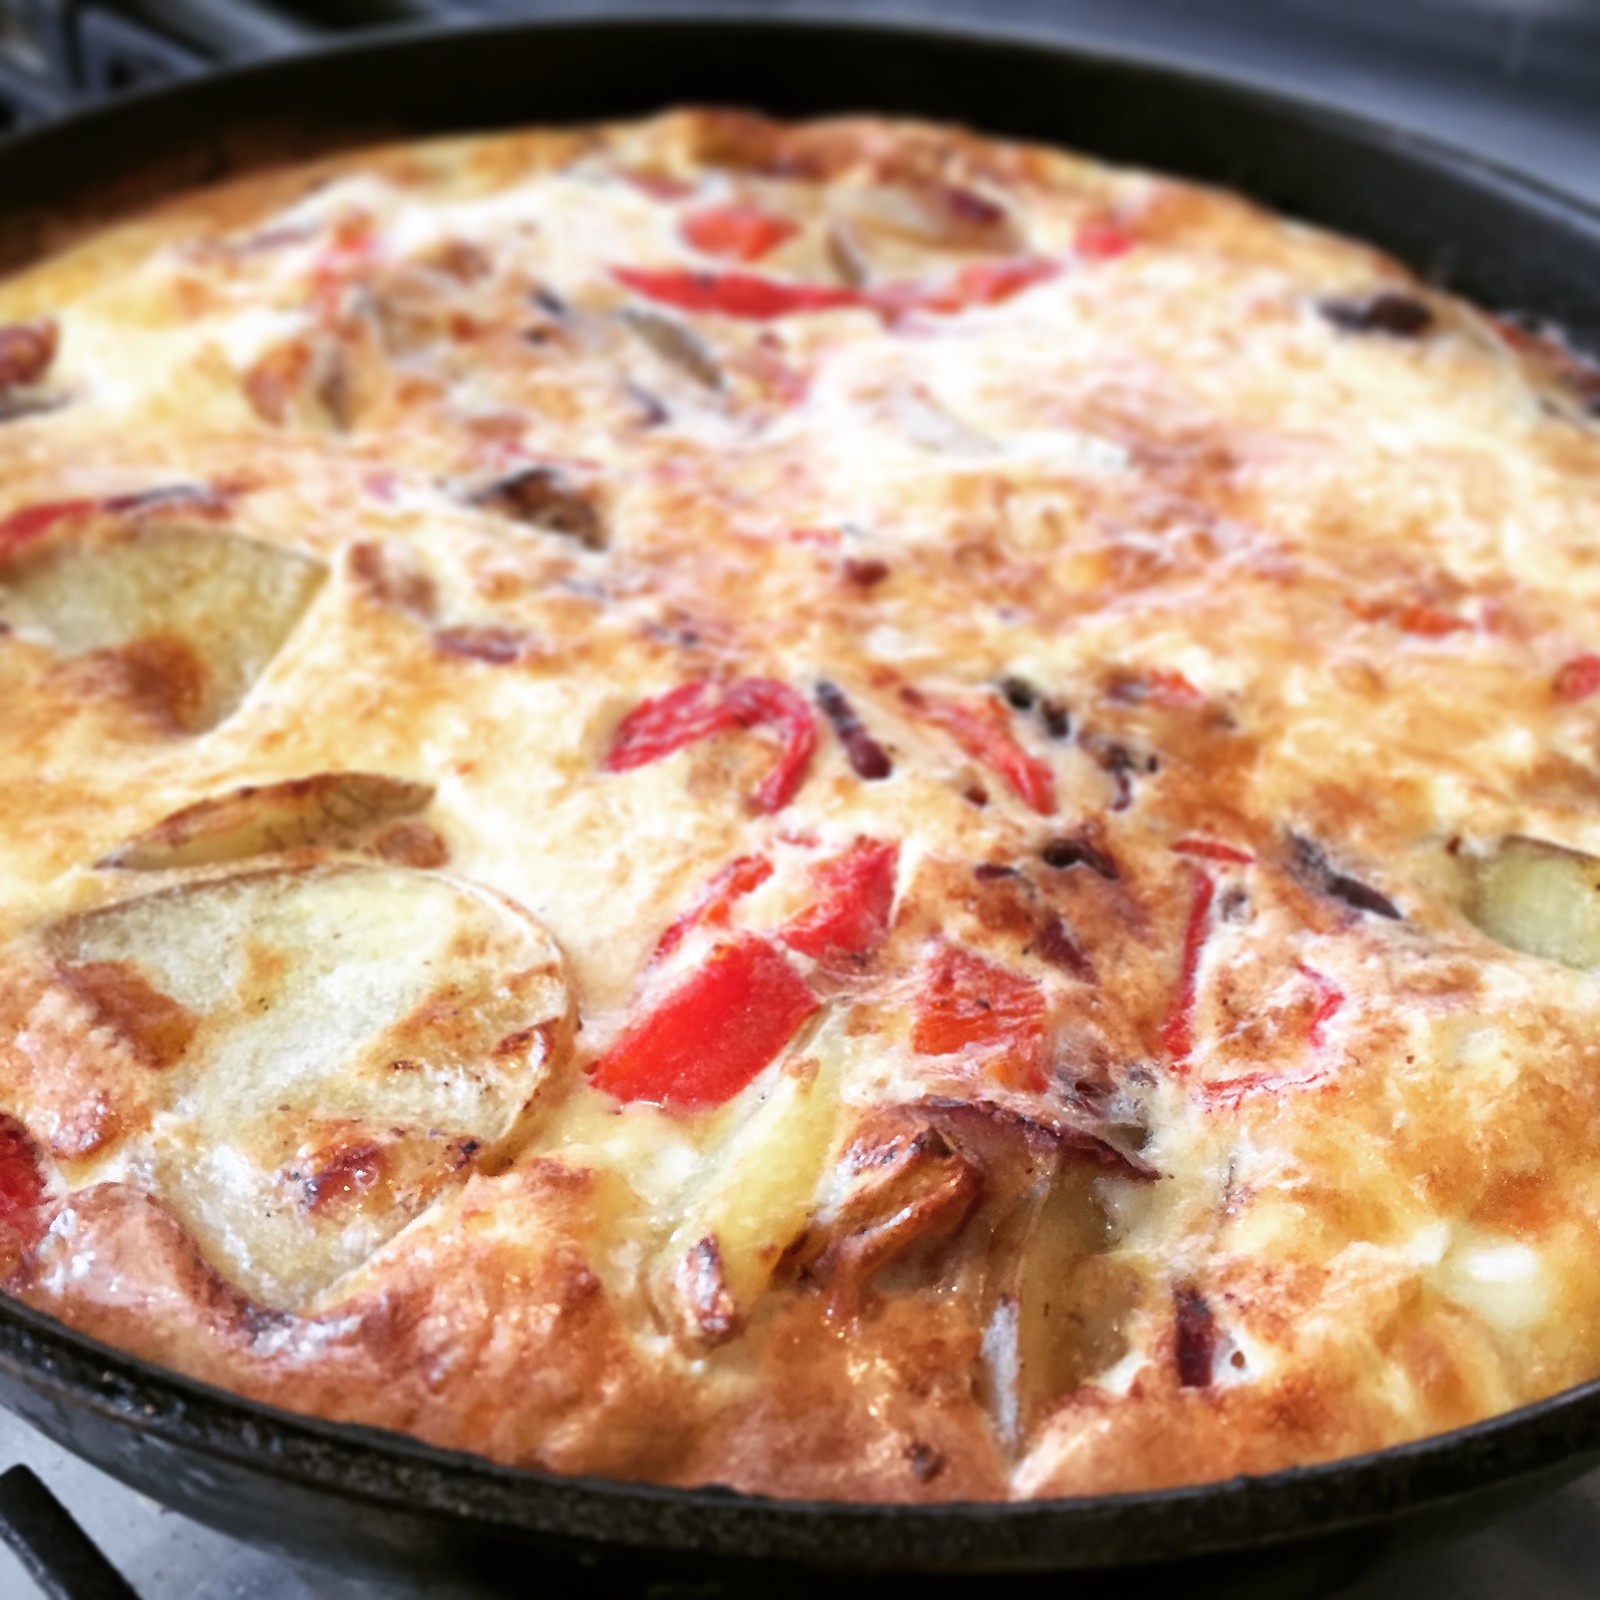
Which happens quite a lot because I make it often. Also known as a Spanish tortilla (or maybe it's not exactly the same thing; I have no idea), it's like a crustless quiche that you start off on the stove top and finish off in the oven. You can put anything you want in it, but the one I made last week had grilled red peppers, potatoes, onion, cheese, and bacon inside. I cut mine into six pieces, and it was a very handy and delicious breakfast at the office that week. You can eat it hot, cold, or at room temperature. Isn't that lovely? What a great dish you are, fritatta.

Here's how I made mine, but I'm going to tell you again, put what you want inside. Just follow the instructions for cooking and egg quantities, but the rest is up to you. I want you to have a fritatta you can love.

Frittata

Red Pepper and Potato Fritatta
(Serves 6)

Per serving: 331 calories, 20g fat, 18g carbs, 19g protein.

8 large (US extra large) eggs, at room temperature
100g (about a cup) of grated cheddar cheese
salt and pepper
1 tbsp olive oil
300g (about 3) potatoes, sliced thinly
1 onion, sliced thinly
4 streaky bacon rashers/slices of bacon, diced
Roasted red peppers that I got out of a jar, chopped. Don't judge.

Preheat the grill/broiler.

Heat a large, oven-proof frying pan with the olive oil over medium heat. Whisk the eggs and cheese with a bit of salt and pepper and set aside. 

Add the onions and potatoes to the frying pan, turn down the heat, cover, and simmer gently for about 15 minutes. Poke the potatoes with a knife to see if they're tender. If not, slap the lid back on and simmer for another 5 minutes or so. 

Take the lid off, turn the heat back up to medium-high, and add the diced bacon. Fry until crispy. Add the peppers until they're heated through. 

Pour in the egg mixture, stir it around a bit, and let it cook until you see the sides start to set. Put the frying pan under the grill/broiler until the fritatta goes lovely and brown on top (about 5 minutes.) 

Leave to cool for a couple of minutes before slicing into six pieces. Put it somewhere in the fridge where your husband can't see it because he will eat all of it before you get a chance to take it into the office for breakfast. 

Wednesday, 22 April 2015

avocado and smoked salmon on toast

I want to create a series of recipes entitled "Diet Food That Doesn't Suck" but really, this is just food that happens to be pretty good for you. I'm terrible at dieting because I love to eat. A lot. The food I eat isn't bad for me; I just eat far too much of it. Add that to the fact that I hate exercise and you've got a happy but rotund Canadian on your hands.

I had my first personal training session on Monday and I still can't walk. "You'll get addicted to it!", friends say. To what, being in agony? You're all masochists, clearly. I hate gyms. I hate exercising in front of other people (which is why I took up jogging and I actually grew to love it even though I'm still really bad at it.) Why the hell am I not only going to a gym but exercising while being scrutinised by a much younger and incredibly buff guy? Because it's the only way I'll be motivated to actually get off my ass. I hate letting people down so I won't want to skip training sessions or go off track. That's the theory, anyway.

I'm attempting to eat normal, human-sized portions and keeping track of what I consume so I can get healthier. If I make something that I think is tasty and remember to take a photo of it, I'll post the recipe. This morning, I made a breakfast based on something a friend of mine had for brunch recently. It was lacking capers and possibly dill or some other green leafy thing, but it was fine. I used BFree bread because wheat and I don't get along all that well. Look, I've had food intolerances long before they became trendy so don't give me any lip. I was subjected to carob in the late 70s, I'll have you know.

Anyway, here's the recipe. It was filling and it didn't suck.


Avocado and Smoked Salmon on Toast
(Serves 1)

Per serving: 364 calories, 18g carbs, 19g fat, 27g protein.

1/2 avocado, sliced
100g smoked salmon
2 slices of whatever bread takes your fancy (a darker bread works well with this, like rye)
1/2 red onion, sliced thinly
8 thin slices of cucumber
About 1/4 cup or 50ml white wine vinegar
1 tsp sea salt
Pepper
2 tsp capers
Dill or whatever leafy green herby thing that goes with salmon that you have

Put the onions and cucumbers in a small dish and cover with the vinegar and salt. Set aside for about 10 minutes but you can do this the night before as well. Drain.

Toast the bread then top with the salmon, avocado, onions, cucumber, capers, herbs, and a good grind of pepper. I also love smoked paprika on avocado and toast, so give that a go as well. If you have any onion leftover, keep it in the fridge covered a little bit of vinegar.

Friday, 20 March 2015

ain't nobody got time for that: weekday recipe roundup

I'm boring myself with my own cooking. I'm limited in what I can make during the week because I'm either in the office or we do All The Things after school on my non-office days. Add this to the fact that two of my kids are relatively picky eaters (thank you Jack for being a human Hoover) and I am NEVER going to cook separate meals for everyone so don't even suggest it, okay?

So this means having to do the rather soul-destroying task of weekly meal planning. I can't just bung things together when I get home, or at least I can't make a regular habit of it. Weekends and Mondays are good because I have more time to cook. The rest of the week is like a food-based game show in which the prize is children that aren't screaming and hungry.

Here is a list of some recipes I've tried out lately that were not only incredibly delicious and fit into my schedule, but the kids actually loved them. Well, except the pasta one because Mia doesn't do pasta. What kid doesn't like pasta? Honestly.

  • Buttermilk roast chicken from the fabulous Smitten Kitchen: based on a Nigella recipe, this does something magical that makes it taste a million times better than plain roasted chicken pieces. You can marinate it up to two days and just whack it in the oven after work for about 35-40 minutes. I serve this with a ready made mash from Tesco that doesn't have any crap in it and just requires a quick trip in the microwave. 
  • Quinoa with things on top (here's a link for some great tips on cooking quinoa): okay look, don't get all arsey with me because I'm mentioning a super trendy food. This quinoa is good stuff if you cook it properly and it holds up very well for a day or two afterwards, unlike its clumpy wannabe twin couscous. Bring to the boil in stock, simmer 15 minutes, drain, put a lid on it and let it sit for another 15 minutes. Job's done. You can get grilled peppers and things you can stick on top with chicken or whatever else you've got. I toss in a little olive oil, lemon juice, and sometimes feta.
  • Slow cooker meatballs: looks labour intensive but isn't, and you can prepare the meatballs the day before. An incredibly rich sauce with flavourful meatballs that made enough to feed four of us (Mia wouldn't entertain the idea) with plenty of leftovers. So, so good.
  • Slow cooker chicken tortilla soup: don't be put off by all the strange and wonderful peppers needed for this soup. I get mine online from http://www.capsicana.co.uk/ or a Mexican online grocer - stock up and keep a bunch in the cupboard. Even Tesco is now stocking dried chipotles and poblanos these days. The most work needed for this one was the toppings because I lovingly organised them all into a lazy susan. The kids LOVED this soup. I'm tempted to add beans to it next time to bulk it out a bit. The soup was delicious and a great remedy to a weekend of overindulgence, but probably not filling enough for a normal meal (for adults) on its own. 
Just don't tell anyone that this week two of my kids had frozen chicken nuggets because I couldn't be bothered to figure out one meal that would make everyone happy. 

Tuesday, 22 April 2014

Mamta's/Kavey's lamb biryani: AKA what to do with leftover lamb

A well-used recipe from Mamta's Kitchen
A very well-loved Mamta recipe I printed up in 2010
I've used and loved the recipes from the wonderful Mamta's Kitchen site for ages now. When I want an Indian recipe, I head to Mamta's because I know it'll be failsafe and delicious.

I stumbled upon her daughter Kavey on Twitter and discovered that she's been posting recipes, too. I had a lot of leftover lamb from Easter dinner and remembered Kavey's post about her mum's lamb biryani (http://www.kaveyeats.com/2014/03/mamtas-delicious-lucknowi-style-lamb-biryani.html), which happened to be posted the same week I made the Worst Biryani Ever.

I should have realised when I read the recipe that it was never going to even remotely resemble biryani. It was sort of like a pilau rice dish or maybe a distant relative of paella if you used your imagination, but whatever it was, it was not biryani. It was incredibly sloppy due to far too much stock. How it got 337 five star reviews on the BBC Food site is beyond me. And don't even get me started about people giving recipes five stars when they have to amend most of it to make it edible.
Really, really not biryani
This is totally not biryani and I can only apologise.
So anyway, proper biryani. Had I done two more minutes of Googling I would have realised that it is a dish of two parts that are layered and baked. Kavey's recipe reinforced this, and I bookmarked it with a promise to give it a go one day. Enter my copious amounts of leftover lamb and a need to get at least one more meal out of it without resorting to shepherd's pie. I used leg of lamb, but I think shoulder would be much better (and cheaper.) 

I didn't stray far from Kavey's recipe; I didn't have saffron or rose water for the rice and used coconut oil to saute everything instead of ghee. As I used cooked lamb, I only simmered it for about 20 minutes. The final dish was absolutely, gloriously scrumptious and I would very happily eat the lamb curry on its own. 

I prepared it ahead of time so I only had to pop it in the oven when I got home from work. Kavey asked her mum about preparing it in advance, and Mamta advised that I chill the rice quickly under cold water before assembling to prevent any nasty bacteria from setting up house in my baking dish overnight. I would add that once you've made this dish, don't reheat it again to avoid the nasties. You ever wonder what often causes "Delhi Belly"? Rice that's been sitting around too long or has been reheated too many times. It ain't pretty. 

The onions do take a while to brown, so heed Kavey's note about it taking about 20-30 minutes until it goes sticky and lovely like this:
Browned onions
 
And don't freak out about using so many onions because they will shrink big time. There is a Japanese word that escapes me for the crunchy layer of rice that forms at the bottom of the pan, but it is one of my favourite things in the world. I greedily scooped out all of this golden layer for myself. Oh yes I did.

So, thank you Kavey for sharing your mum's beautiful recipe and for giving me something more creative to make with my leftover lamb. All five of us loved it and I would make it again in a heartbeat.

Lamb Biryani


Thursday, 23 January 2014

cheddar and jalapeno pepper muffins

So what do you do when you're stuck indoors with two poorly children, attempting to work from home, while it's absolutely pissing down with rain? You bake, obviously.

I was looking through the Internet (I like read the whole entire thing when I'm procrastinating) for a grain-free baked good recipe. I was going to make something sweet but as I'm attempting to wean myself off sugar/the need for sugar, I went for something savoury instead. And anyway, healthy substitutes for cakes always taste like a loofah covered in Stevia powder. Don't try to tell me they don't; you're just so ravenous from being on a diet that you think it tastes good. I've been there. I know.

Anyway, I decided to make something resembling cornbread muffins to go with my leftover chilli for lunch. I found this basic almond flour muffin recipe on Elena's Pantry, added some extras, and doubled it: http://www.elanaspantry.com/ratio-rally-quick-breads/ To my huge surprise (see my comment about substitution failures) they turned out to be pretty damned tasty.

They aren't corn muffins because they don't, you know, contain corn. They do have a very similar texture and a little bit of sweetness you'd get with cornbread. They are very passable and tender cheesy muffins that went well with my chilli. And then I ate another just to be sure. It was still good, but I'll have to try another one tomorrow to make sure they're still delicious the next day. Shall keep you posted.

You could add all sorts of things to the basic muffin batter, sweet or savoury. I was thinking of doing a breakfast version with bacon (I know, I know - this will do nothing to dissuade people from posting bacon jokes on my Facebook page), spinach, mushrooms, and cheese or a pizza version with tomatoes, basil, cheese, and pepperoni. It'll just depend on how many deadlines I'm trying to avoid.

Here's the recipe.
Cheddar Jalapeno Muffins
Cheddar and Jalapeno Muffins
(Makes 8 large 'Merkin sized muffins)

Ingredients:

8 oz blanched almond flour (approx. two cups)
1/2 teaspoon baking soda
1 cup shredded mature cheddar or Monterey Jack cheese
1 jalapeno pepper, finely diced (or more if you want more heat)
1 tbsp sea salt
1 tbsp mild chilli powder
8 oz eggs (four large eggs)
2 oz honey (approx. two tablespoons)
1 teaspoon cider vinegar

Preheat the oven to 180C/170C fan assist/350F. Line a muffin tin, or if you've got a very well seasoned tin like I do, just spray a little oil on it.

Put the almond flour, baking soda, cheese, jalapeno peppers, chilli powder, and sea salt in a bowl and combine. In a large bowl, whisk the eggs, honey, and vinegar. Add the dry ingredients to the wet ingredients and stir well.

Bake for around 15 minutes, until the edges are brown and a toothpick comes out clean. Leave to cool in the tin for 30 minutes, then cool completely on a wire rack before storing.

Thursday, 2 January 2014

aubergine (eggplant) with ragu sauce

I stopped writing about food on this blog because I thought people who were here to read all about my thrilling life wouldn't want to read about the food I make. As only about three of you read this blog anymore and food is a huge part of our lives, the food is back.

This is also to help keep me on track with the Not Eating of the Crap. If I blog about the Not Crap I'm eating, I might actually not eat Crap. (I really need to get back to work; my brain has obviously packed it in.)

Yesterday was all about carbs thanks to too much bubbly the night before. And Pringles. And chocolate cake. I made a big batch of spaghetti bolognaise last night, and the world seemed a slightly better place. A little leftover sauce made a healthier lunch for me today, with the addition of one small aubergine and mozzarella balls. I'm feeling all smug and virtuous now. I've stuck to my diet for 6 1/2 hours so far. BOOYAH.

Oh Christ, I'm annoying. Here's the recipe.

Aubergine Bolognaise With Mozzarella
(Serves 4, or less with extras for the next day)

For the bolognaise:
2 tbsp extra virgin olive oil
1 stalk celery, finely diced
2 carrots, finely diced
1 onion, oh you get the idea. Cut everything up small.
2 cloves of garlic, crushed
500g beef mince/ground beef
1 glass of red wine
1 tin plum tomatoes
1 box (about 2 cups) of passata/tomato sauce
Dash of worcester sauce
Salt and pepper to taste
Handful of fresh basil

For the aubergine/eggplant base:
1 tbsp extra virgin olive oil
2 aubergines/eggplants, thinly sliced
250g fresh mozzarella
Fresh basil to garnish

To make the sauce, heat the olive oil in a large shallow pan over medium heat. Fry off the beef until it browns - try not to move it around too much so you get some nice crispy bits (rather than boiling it.) Remove the beef from the pan.
Add the celery, carrots, onion and garlic to the pan, and stir until it starts to soften.
Put the beef back in the pan along with the glass of wine. Let the wine bubble and reduce a bit, then add the tomatoes, passata/tomato sauce, worcester sauce, and salt and pepper.
Let it simmer, covered, for at least half an hour but ideally 1-2 hours. This can also be left to simmer in a slow cooker, or cooked ahead and frozen.

For the aubergines, heat the oil over medium-high heat in a large frying pan. Toss in the aubergines and cook them off until they brown a little. Add the sauce and heat through. Just before serving, tear up the mozzarella and add it to the pan, and let it melt a little. Garnish with fresh basil if you like that sort of thing.

Tuesday, 8 March 2011

pancakes: they're not just for breakfast

It's Shrove Tuesday (AKA Pancake Tuesday), which gives me an excuse to make pancakes in the middle of the week. And when I say "pancakes", I mean the fluffy kind of my childhood, possibly with a side of bacon. I've got nothing against the crepe-style ones traditionally served here (especially when smeared with Nutella), but they just aren't pancakes to me. We like to do everything in North America bigger and fatter because we're awfully good at it. I loved Shrove Tuesday. The idea of pancakes for supper was incredibly exciting, and I'm not sure who was most excited about it - me or my Dad. It was one of the first things I ever cooked on my own at around age 7.

I've been using the same pancake recipe for decades now, from a very worn and much-loved copy of "The Joy of Cooking". In fact, the pancake recipe page fell out of the book from overuse and is now in another recipe folder. This recipe makes around 10 teacup saucer-sized pancakes, or 6 of these utterly amazing Star Wars pancake molds from Williams Sonoma.You can make the batter ahead of time; I don't think it really matters and it doesn't seem to "improve" it (I have the same philosophy about Yorkshire pudding batter). You don't have to separate the eggs and whisk up the whites if you don't have time, but I find it does make the pancakes much fluffier. You can't get double action baking powder here, so just use regular baking powder if you don't have it. The double action variety does make the pancakes quite a lot lighter, but they'll still turn out fine with regular baking powder.

Now for my Canadian secret tip: knowing when the pan is the right temperature. Warm up your pan over medium heat, and when you think it's ready, flick some cold water onto the surface with your fingers. If the water sizzles and disappears immediately, the pan's too hot. If the water sits there and does nothing, it's too cold. If it forms into a plump bead that merrily sits there and sizzles a bit, it's just right. I use a nonstick pan or griddle, so I just put a little rapeseed/sunflower oil on a paper towel and grease the surface very lightly.

Big Fat American Pancakes
1 1/2 cups plain flour
1 3/4 tsp double action baking powder
1/2 tsp salt
3 tbsp sugar
2 large eggs, separated
3 tbsp butter, melted and cooled
1 cup milk

Into a large bowl, sift the flour and baking powder (you can then sift it again, if you like). Add the sugar and salt, and set aside. In a separate bowl, whisk the egg whites until they're dry, but not stiff.  In a large measuring jug, stir together the milk, melted butter, and egg yolks. Slowly add the wet ingredients to the dry, and whisk by hand until most or all of the lumps are gone. Carefully fold in the egg whites with a spatula until combined. The batter will be quite thick - like drop scone or crumpet batter - so don't be tempted to add more milk. I usually scrape the batter back into the large measuring jug and use it to pour the batter into the pan. 

Pour the batter into the hot pan in whatever shape or size you'd like - it will spread a little as it cooks. When the top is covered in bubbles and the sides start to look dry (or lift the pancake and check it to make sure it's not burning.), flip it over and cook for another 2 minutes or so.

Put a little butter on top, drown it in maple syrup, and watch your kids go nuts on the sugar rush. And enjoy.

Sunday, 24 October 2010

one banana, two banana, three banana, four

Banana bread is one of my favourite things on earth. It's one of the tastes of my childhood and became a staple during all of my pregnancies. When I was pregnant with Jack, I discovered that Nutella smeared on a piece of banana bread was a lovely, lovely thing. (And my considerable girth at the end of that pregnancy was proof of my love.) When I was pregnant with Mia and Isla, I got the urge to bake towards the very end - probably part of that so-called "nesting phase" - and made loaves of banana bread just before they were born. In fact, before yesterday, the last loaf I made was the day before Isla arrived. So to all you heavily pregnant and fed up ladies out there, banana bread may be your answer*.

Paul and Jack returned from school on Friday with a carrier bag full of very ripe bananas, which was obviously a sign from the gods that I should bake. Banana bread was a given, and a quick poll of my friends and a scan through my cookbooks gave me a few more ideas. So first, my Mom's banana bread recipe. I think this came from one of our church cookbooks when I was a kid. All I know is that Mom has been using this recipe for as long as I can remember and it works every time. I think that the flavour gets better with age; banana bread is best eaten later that evening or the next day, in my opinion. I keep mine in the fridge because I like how dense and chilled it gets, but feel free to keep yours wherever you'd like. It also freezes well; slice it up and put greaseproof paper between the slices before freezing, and you can either defrost the slices gradually on the worktop or stick them in the microwave for around 20-30 seconds if you're impatient. This is a cake rather than a bread (despite the name), in that it's quite sweet and doesn't really require anything on it. Unless, of course, you enjoy Nutella and have a massive sweet tooth.

Mom's Banana Bread


2 cups of plain flour
1 tsp baking soda
1/2 tsp salt
1/2 cup butter, softened
1 cup granulated sugar
2 large eggs
1 cup of mashed bananas (approximately 3 medium bananas)
1/3 cup of whole milk
1 tsp fresh lemon juice

Preheat the oven to 350F/180C and grease a loaf pan. In a medium bowl, sift the flour with the baking soda and salt. In a large bowl, cream the butter and sugar until it's light and fluffy. Add the eggs and mashed bananas, and beat until they're thoroughly incorporated. In a mixing jug, combine the milk and lemon juice. [I suspect that this was a substitution for buttermilk (perhaps adapted from the original recipe), so I'm sure you could use 1/3 cup of buttermilk in place of the whole milk and lemon juice.] Add about 1/4 of the dry ingredients to the banana mixture, then a tablespoon or so of the milk mixture, and continue alternating like this until everything is mixed in, ending with the dry ingredients. [I don't really know if this matters, but it seems to be a common instruction in a lot of North American baking recipes. Whether or not starting and ending with dry ingredients and alternating like this does anything magical to the finished product is a bit of a mystery to me. But it's what I always do, and I'm too lazy to experiment and see what happens if I just bung everything into the bowl.] Bake for around an hour. When a cake tester comes out dry, it's done. Let the bread cool a little, then turn it out on to a wire rack to cool completely. Don't try to slice it before it has cooled, or else it'll crumble all over the place.

The second recipe of the day was for banana chocolate muffins, courtesy of the Hummingbird Bakery cookbook. Now, I know that many people are not fans of this book and I've heard several people complain that many of the recipes don't turn out properly. Me, I've never had anything go horribly wrong and I've enjoyed the recipes I've tried so far. But having said that, I think this recipe does need a little tweaking. It calls for 1 tsp ground ginger, which for me, was far too overpowering and almost completely masked the flavour of the bananas. This is very apparent if you try the cupcakes without the icing, as I did when I shared a sample uniced cake with Isla. The ginger does work with the chocolate, but it's still very dominant. Next time, I'll leave it out. Also, it calls for 1 tablespoon of baking powder which sounds like an awful lot to me, but I did use it and it worked fine.

I won't include the recipe here as many others have posted it and I don't want to make the nice people at Hummingbird grumpy by copyright infringement. Suffice it to say, these are worth making. Feather light, delicate, and delicious. A big hit with all three kids, and Mia thoroughly enjoyed mashing the bananas. 

Thanks to the advice of my friends, I've frozen the rest of the bananas for another baking day. Which should go well, provided I don't confuse them with the bananas that have been sitting in my freezer since I was pregnant with Isla (originally intended for energy-providing smoothies during labour.) Which reminds me of the time I defrosted my freezer back in Montreal and the ice was so thick, a bag of corn I forgot that I had plopped out when it melted away. My freezer: a voyage of discovery and ancient artifacts.

*(Probably not, but it can't hurt.)

Monday, 23 August 2010

a tale of three recipes


I found myself with an excuse to try out three recipes for a charity yard sale. I always enjoy baking for something or someone else because a) I get to make something sweetly decadent in our usually sugar-free house and b) it won't stay in my house and therefore I won't scarf the whole batch down in front of the television with a bottle of Baileys.

When I saw the recipe for bakewell slices/squares from my friend Annalisa Barbieri, I knew this one was going in the oven as soon as I found an excuse. I adore bakewell tarts - pastry crust spread with a layer of jam, topped with an airy almondy layer and icing - and loved the idea of doing them in bar form. Her recipe is very easy to follow (don't get scared off by the thought of making the pastry layer) and the accompanying text is fabulous. All recipes should be written like this; it's like having your best friend next to you talking you through the process rather than the intimidating formal instructions often given in books. (I think authors like Nigella Lawson and Nigel Slater are exceptions to this, probably because they are food writers rather than chefs.)

They turned out nicely, easily, and weren't overly sweet as you often find with commercially-produced bakewell tarts. It's only now that I notice how different mine look to Annalisa's. My pastry isn't crumbly and the almond layer looks far more dense. I've been eyeing my scale suspiciously after a few baking mishaps lately, so I think I may have added a bit too much butter to both the pastry and filling. Or maybe I just suck at pastry. No matter, they taste marvellous and hold together brilliantly as squares. Next time, I'll probably make a cherry compote type of thing like Annalisa made rather than the jam because it soaked into the pastry and almost wasn't a visible layer in the end.

Brownies: may cause death in large quantities
I was looking for something easy and that would make a vast quantity, so who better to consult than the queen of excess herself, Ina Garten? I love Ina. I wish Ina was my auntie and we could stay at her house in the Hamptons every summer. She would bring us trays of muffins, pancakes, fritattas, and carafes of coffee in the morning, and ply us with butter-filled delights for the remainder of the day. Her gay friends would come over and we'd sit on the beach and laugh about other Food Network chefs while we sip cocktails by the pitcher. Where was I? Oh yes, brownies. Lots of them. I remember seeing her make her Outrageous Brownies on television, and thinking "Why the hell does she always cook enough to feed 50 people?" Thankfully, this came in handy for the yard sale. They are, as you'd expect, everything you'd want in a proper American brownie: an enormous amount of rich chocolate, a slightly crisp outer layer, and a fudgey, almost undercooked middle. They are very similar to the recipe in Nigella Lawson's How to be a Domestic Goddess, with the addition of instant coffee granules. I omit nuts from any brownie recipe I make, only because I cannot stand nuts with cake. I don't want anything to interrupt my enjoyment of pure chocolate loveliness, and this includes children, the telephone ringing, people at my door attempting to convert me to their religion, and nuts.

These brownies are very easy to make and apart from the lack of nuts, the only other change I made was using 72% chocolate (Green & Blacks) only instead of a combination of semisweet and bitter. Follow Nigella's recipe if you want to make a reasonable quantity, and follow this one if you want to feed a small nation.

World Peace Cookies
The final baked good, which didn't make it to the yard sale (reasons to follow), were World Peace Cookies from the beautifully photographed and wonderfully written Smitten Kitchen blog. These are what I would call "grown up cookies". They're very light, crispy (comparable to a French sable), and deeply chocolaty without much sweetness. A large cold glass of milk is a must with these, or a good cup of tea.

As I mentioned earlier, I'm deeply suspicious of my scale at the moment, which increased after I made this dough. Most of the comments following this recipe complained about the crumbly dough, and my friend Helen who recommended the recipe to me also mentioned taking a bit of flour out if it didn't hold together for me. So when it rolled up easily and didn't fall apart when slicing it, I knew something had gone amok. I did a test run of only three cookies (I'm not a confident baker, usually for good reasons) and they melted into little black burned pools of chocolate and butter. I sliced off three more, thicker this time, and only cooked them for half the given time, watching them like a hawk. The photo on the left is the result, so not a bad attempt over all. Not having time to redo the dough before the sale, they will remain on my "to do" list until next time.

I am, somewhat alarmingly, becoming known as "the lady who makes cakes". Obviously this is entirely my fault, due to blog posts like this and various photos I've uploaded to Facebook. The thing is, I don't particularly like to bake. It's too specific and scientific, with no room to improvise - unless you're a confident baker, which I'm not. I feel a bit of a fraud when people compliment my baking talents because in my mind, I've simply found a good recipe that works. When I put together a savoury dish, I do feel I can claim it as my own. I might use a recipe for inspiration or get an idea from a cooking programme, but I tend to make things up as I go along and the dishes evolve over time. I don't mind adding a bit of this and that, omitting something, substituting another, adapting ingredients, or combining ideas from several recipes. When it comes to baking, I follow the recipe to the letter. I have to read and re-read the recipe several times, because I almost always miss a vital step. It's not intuitive to me, so I don't "know" what to do unless I've made it a million times before.

I am a lady who likes to eat cake, for sure. When I bake and it turns out well, I'm always surprised and pleased, which is why photos get posted and recipes get blogged. In my heart of hearts, I would much rather let someone else do the baking, preferably in a cafe setting that serves great coffee.

Saturday, 14 August 2010

curry night

There's something about Fridays that make me want to eat curry (and drink something large and alcoholic), so I decided to make one of our favourites and also try out a new dish. And have something large and alcoholic. Mojitos, if you're wondering.

I was watching "Saturday Kitchen" a while ago, and the Hairy Bikers were guests. They'd just finished filming a series in India and demonstrated how to make a South Indian prawn curry. It looked easy and tasty, and I gave it a go - it's since become one of our favourites. I normally make it with prawns but sometimes I add other fish (scallops, monkfish, salmon, etc - anything firm). I also make it with chicken thigh filets, which is what I did this time. You could use chicken breasts if you're not keen on thighs, but brown meat has infinitely more flavour and stays much more moist, and the caloric difference isn't very substantial. Here's the recipe as I made it last night:

Chicken Curry

  • 1 onion, peeled and roughly chopped
  • 1 green chilli, trimmed, seeds removed
  • 2 garlic cloves, peeled
  • 4cm/1½in piece fresh ginger, peeled
  • 1 tbsp sunflower oil
  • 12 fresh curry leaves (I use freeze dried)
  • 1 tsp black mustard seeds
  • ½ tsp ground fenugreek
  • pinch asafoetida
  • ½ tsp ground turmeric
  • 500g/1lb skinless, boneless chicken thighs, chopped into bitesize pieces
  • 200ml/7fl oz coconut milk (I used one tin of Blue Dragon's "mini" coconut milk)
  • 1 lime, juice only
To serve:
  • 4 tbsp chopped fresh coriander (cilantro) leaves
  • 1 lime, cut into wedges
 Method:
  1. Blend the onion, chilli, garlic and ginger to a paste in a food processor.
  2. Heat the sunflower oil in a frying pan over a medium heat, add the curry leaves, mustard seeds and methi powder and fry for 20-30 seconds, or until fragrant.
  3. Add the onion, chilli and garlic paste and fry over medium heat until it turns brown (keep an eye on this so it doesn't burn!)
  4. Add the turmeric and coconut milk, and season. Cover and bring the mixture to a simmer for 10 minutes, or until the chicken is cooked. Remove from the heat and squeeze over the lime juice. Taste and adjust the seasoning if necessary, and add a little hot chilli powder or diced fresh chillis if you'd like a little more heat.
  5. Garnish with the chopped coriander and lime wedges.
The mushroom dish was based on this curry recipe from the fantastic Mamta's Kitchen site (my "go to" site for anything Indian.) We're off the peas at the moment (too carby), so I substituted spinach which worked really well. Otherwise, I mostly followed the recipe as written (I used only 1tbsp of oil.)

The whole meal was under 400 calories, 5g net carbs. Oh and one mojito (sweetened with Stevia) is 60 calories and 0g of carbs. Just so's you know.

Tuesday, 6 July 2010

paleo/low carb/gluten free/whatever you wanna call it pizza

I do try to eat a low carbohydrate diet when I can, not counting those times I have wine and cake (*cough*). There is a history of (pre and adult onset) diabetes in my family and being the apple-shaped gal that I am, I try to eat a low sugar diet to get the weight off and reduce the risk of developing type 2 diabetes. I'm not usually a fan of finding replacements for high carbohydrate dishes - don't even get me started on cauliflower "mashed potatoes" - but I came across a recipe today for flourless pizza, and thought I'd give it a go.

I love almond flour (ground almonds) and use it for baking and making pancakes. I stumbled across a recipe for pizza using ground almonds on Mark's Daily Apple, and curiosity got the better of me. I made some minor adjustments and used my favourite sauce recipe, and lo, pizza came out of my oven for the first time in a very long time. To my surprise and absolute delight, it tasted good. Obviously, this will never come close to proper pizza dough made with 00 flour and baked in a wood oven by someone who loves you a great deal, but it is a worthy substitute. I think this base would also work very well for a savoury tart (e.g. goat's cheese, tomato, basil, and caramelised onions) or for a sweet tart or cheesecake base (omit the salt from the dough recipe and add a little sugar/sugar substitute.)

Some tips before the recipe:
  • Add more sauce than you normally would for a wheat flour-based crust. The almonds absorb a lot of liquid, and the pizza can come out on the dry side if you don't use enough sauce.
  • This base has a very neutral taste. Unlike a traditional crust, you won't get much flavour from the dough. A traditional Margarita pizza, for example, probably won't work very well with this base. Go for big flavours in your toppings, like spicy meats, chillis, herbs, and strong cheeses.
  • The base will end up like a soft shortbread consistency. If you prefer a thick, chewy/grainy crust, don't press it out thinly. Once the pizza cools, the crust firms up quite a bit and becomes crispy on the outside.
  • I found this pizza to be quite filling. This recipe makes a pizza roughly the size of a dinner plate if you press the dough out fairly thinly, which I feel is enough for two people if you serve it with something on the side, like a salad.
Flourless Pizza

For the base:
1 cup almond flour/ground almonds 
1 large egg
1 tbsp olive oil
Pinch of salt 

For the sauce:
1 tin plum tomatoes
2 cloves garlic, peeled (left whole)
A few sprigs of fresh basil
2 tbsp extra virgin olive oil
Salt and pepper to taste

Method:
Preheat the oven to 180C and grease and/or line a baking sheet.

Combine the base ingredients in a bowl until it forms a firm ball (similar to a cookie dough consistency). Add more almond flour if necessary. Press the dough on to the baking sheet, forming a circle. Create a "lip" around the edge of the dough. (See photo, right.)

Bake for 15 minutes, or until golden brown. (See photo, left.) In the meantime, make the sauce. Add the olive oil and garlic to a saucepan over medium heat, and warm the oil until the garlic starts to sputter. Add the tin of tomatoes and basil. Let the tomatoes simmer for around 5 minutes, stirring and breaking up the tomatoes with a spoon. Pour the tomatoes through a coarse sieve, pressing it down to squeeze out all the juice. Pour the sieved tomato sauce back into the pan, and let the sauce simmer over medium-low heat until it's thickened. Season to taste.

To your cooked base, add the sauce and toppings of your choice. Return the pizza to the oven and bake for another 15 minutes, or until the cheese is bubbly. Remove from the baking sheet so that it doesn't stick to it as it cools.
Slice, serve, eat, and relish in the fact that you're eating pizza.